WiiU
- How To's
- Formats, Tools and Guides
- Master tool list
- WiiU Title Formats
- USBHelper + USBHelperLauncher
- Maschells Toolkit
- FunkiiU/FunkiiUi
- Running WiiU Software
- Translated Pages
- Links to Hardware Mods and other shit
How To's
How do I get "Game" on Cemu/WiiU
This page is a work in progress. Links may not go to the right places or just not exist. Please be patient while I complete it.
How this page works.
This guide is a little backwards and may be confusing as it starts with the last steps first. Think of it as a choose your own adventure book but you want to get to a specific ending, so you start there and work backwards to find out what you need to do.
So, get yourself something to write some notes down on and write down the heading code so you can refer to it later.
For Example, to get a game onto Cemu you want to do
- 1a
- 2b
- 4t
etc
(these aren't finalised yet)
and then you can work backwards by clicking on the titles on the left sidebar (over there <<--)
1. Working out what you want to end with
1a. A game on an emulator (Like Cemu)
For this you want to end up with "Raw Files" (otherwise known as loadiine1) because Cemu supports "Installing" them. The file format of raw files is
📁 gamename_folder
┣ 📁 code
┃ ┣ app.xml
┃ ┣ cos.xml
┃ ┣ *.rpx
┃ ┗ *.*
┣ 📁content
┃ ┗ this is the game content, folders will vary
┗ 📁 meta
┣ meta.xml
┣ *.jpg
┣ bootTvTex.tga
┣ bootDrcTex.tga
┗ iconTex.tgaYou can then follow the official Cemu title installation guide to install your games.
You can use WUD and WUX files as well but it is more space efficient to convert it into RAW files. You also won't need to worry about adding the Disc Key2 into the keys.txt file.
Please, for the love of the emulator gods, use the correct emulator for the game you want to play. Use Dolphin for Wii / Gamecube games, Project64 or Mupen64 for Nintendo 64 titles, etc.... There is no point in putting a virtual console title (literally a rom and an emulator) in Cemu (which is an emulator). Click here for a list of emulators and things to search for when you to go that way.
1b. A game on a WiiU (Like a WiiU)
For this you want to end up with what we call a "WUP" (WiiU Package) because you can install them to your WiiU with WupInstaller. A WUP looks like this
📁 gamename_folder
┣ title.tmd
┣ title.tik
┣ title.cert
┣ *.app
┗ *.h3Or when you have it on your SD card (the install folder is case sensitive, in other words, it must be lowercase)
💾 SD card root
┗ 📁 install
┗ 📁 gamename_folder
┣ title.tmd
┣ title.tik
┣ title.cert
┣ *.app
┗ *.h31 Loadiine is an outdated method these days, its better to just use a WUP on a WiiU
2 A Disk key is not a Title Key
2. Methods of getting the format you need
2a. Raw Files
You can get Raw Files from a variety of sources, but in most cases they are
- Retrieved / dumped from a WiiU (https://cemu.cfw.guide/dumping-games)
- Unpacked from a WUP
- JNUSLibDecryptor
- JNUSLibDecryptor (https://github.com/Maschell/JNUSLibDecryptor)
- CDecrypt
- JNUSLibDecryptor
- Extracted from a WUD or WUX
- JWUDTool (https://github.com/Maschell/JWUDTool)
- Downloaded from the NUS using a NUSDownloader
2b. WUP
A WUP can be
- Downloaded from the NUS using a NUSDownloader
- Generated by a NUSPacker or an Injector
- Extracted from a WUD or WUX
- JWUDTool (https://github.com/Maschell/JWUDTool)
2c. WUD / WUX
The only current known method to getting a WUD file (or in turn a WUX) is either by dumping it from a disc or downloading it. You can not generate a WUD or a WUX from a WUP or Raw Files.
- WUD
- wudump on a WiiU
- Decompressing a WUX
- JWUDTool (https://github.com/Maschell/JWUDTool)
- WUX
- Compressing a WUD
- JWUDTool (https://github.com/Maschell/JWUDTool)
- Compressing a WUD
Remember, for a WUD or WUX to be decrypted (or used directly in Cemu) you NEED the Disc Key (usually found somewhere with the WUD/WUX file as a text string or a binary file [open with a hex editor]) and NOT the Title Key
3. So I have decided on...
3a. Using a NUSDownloader to download a WUP or RAW files
Remember, NUSDownloaders can only download what was released on the e-shop and if it still exists on the servers. To check it you can try to find your game on the WiiUBrew title database and/or titlekeys.ovh.
If It doesn't exist on either/both lists you will have to locate the game as a WUD, WUX, WUP or "loadiine" somewhere on the internet.
A NUSDownloader as its name suggests, downloads from the NUS (otherwise known as the Nintendo Update Servers). Due to an oversite by Nintendo, they left their servers unsecured so with some work (either by hand [which is a pain in the butt] OR with a tool [heckin easy]) you can "Just download from them" just like a WiiU does.
A common question is "Do you need a WiiU?" The answer is No, No you don't..... Well, you do need a WiiU if you want to install the game onto your WiiU but that kinda makes sense doesn't it?
You have a few choices when it comes to NUSDownloaders, but this is what we suggest.
- USBHelper + USBHelperLauncher
- Outputs
- WUP
- RAW
- Pros
- Good for newbies
- "Just works" (in most cases)
- Pretty GUI
- "Just use this one™"
- Cons
- Quite a few steps
- Can have issues
- Only Windows (with "beta" Linux support via Wine)
- Outputs
- FunkiiU
- Outputs
- WUP
- Pros
- Cross platform, written in Python 3.7 (could be 3.8, I don't remember)
- Cons
- Only downloads a WUP, will need to use another tool to unpack to RAW files
- Command line only
- A fork that has a GUI does exist, FunkiiUi
- Outputs
- JNUSTool
- Outputs
- WUP (no title.tik so can't be installed with WUPInstaller)
- RAW
- Pros
- Cross platform, written in Java
- Can go straight to RAW files
- Cons
- Command line only
- Can be a little too fast for its own good, will need to be run multiple times to ensure complete downloading of all files
- Outputs
3b. Generating a WUP
So, there are some difficulties when it comes to generating WUPs. These occur mostly with NUS Updates as they have hardlinked (or it could be softlinked, I don't remember) files. If you decide to re-pack something that you downloaded from the NUS it is also generally not the best idea as the title key will (probably) be different and other things like hashes and such. It would be better to just re-download it using your choice of tool.
Injections are a different thing as they are generated by the tool like UWUVCI or Teconmoons (depreciated) and won't have any issues when it comes to installing them onto your WiiU.
- UWUVCI https://gbatemp.net/threads/release-uwuvci-injectiine.486781/
- Teconmoons https://gbatemp.net/threads/release-wiivc-injector-script-gc-wii-homebrew-support.483577/
3c. Dumping my files from my WiiU
Just follow the guides here https://cemu.cfw.guide/dumping-games
3d. Getting the WUP from my own Disc
There are a couple of ways to do this, but they both require a real WiiU
- Easy
- wudd on a WiiU
- Hard
- Dumping your whole disc with wudump and then extracting the wup from it
- wudump
- JWUDTool
- Dumping your whole disc with wudump and then extracting the wup from it
3e. Downloading it from somewhere
All this wiki can do is point you in a direction. We can not give you direct links to said content. The r/roms megathread is a place to start
4. So you have the files you need, how do I get it on Cemu/WiiU
4a. Cemu
- Check your setup with this page to see if your PC is compatible
- Install Cemu with the official Guide
- Install the game with the official steps
4b. WiiU
- Make sure you have a WUP format game
- Copy it to your WiiUs SD card (like in 1b)
- Install (while CFW is running [haxchi/mocha]) with WupInstaller
Note: Games that have pirated DLC or is an Injection you will need CFW running to run it or you will get the 199-9999 error and you will need to reboot your WiiU
Formats, Tools and Guides
Master tool list
WiiU Tools
Dumping
- WUDumper
- disc2app
- ftpiiu (ftpiiu_everywhere)
PC Tools
NUS Downloaders
- USBHelper + USBHelperLauncher (Recommended for newbies)
- Pros:
- Has a nice GUI
- Easy to use for those who aren't skilled with the command line
- Cons:
- Can have issues on some systems due to weird Windows bugs
- Pros:
- FunkiiU
- Current guide is offsite > https://gist.github.com/Irastris/31766414a981a056d49c1242a019829a
- Python 3.x
- Will be forking it to this wiki in due time
- Pros
- Cross Platform
- Cons
- Command Line (Unless you use FunkiiUI )
- JNUSTool
- https://github.com/Maschell/JNUSTool/releases/latest
- Java
- Cross Platform
- Pros
- Good for Cemu
- Cons
- A bit too fast for it own good, can mess up so you need to run it multiple times
- Command Line
Format Converters
- JWUDTool
- JNUSLibDecryptor
WiiU Title Formats
Overview
WiiU titles come in a variety of formats, this is a list of most common to least common formats and its pros and cons
RAW
- Otherwise known as Loadiine, Unpacked or CCM (Code Content Meta)
- Contains the literal raw files for the game
- Pros
- Excellent for Cemu and other Emulators
- Handy for direct file modding or investigation
- Cons
- Due to how Updates are stored in a WUP, some files are not unpacked. This is only important if you are re-packing a RAW format update into a WUP
WUP
- This is a WiiU Package
- Known within this Wiki as "Encrypted NUS Content"
- The content files are encrypted with AES-CBC (128 bit)
- [Details about the encryption here]
- Files included in a WUP are
- tmd or title.tmd
- This is the titles metadata
- cetk or title.tik
- This is the installation "ticket". it also contains the encrypted "title key" for the title
- cetk or title.cert
- This is the certificate
- *.h3
- These contain hashes for the app files
- They only exist when the app file is over a certain size.
- They share filenames with the app files
- (no extension) or *.app
- These files contain the raw files in encrypted binary
- Pros
- Probably the best archival format due to it being installable to WiiUs AND being easily unpacked into RAW files
- Cons
- Due to the encryption it does not compress well
- tmd or title.tmd
WUD
- This is a WiiU Disc image
- It is a 1:1 disc dump of the game
- Will be about 25GB in size
WUX
- A compressed WUD
USBHelper + USBHelperLauncher
This tool has been depreciated. We recommend giving WiiUDownloader a try before you go ahead and install USBHelper
https://testing.agilly1989.xyz/#/WiiU/Tools/Nusdownloaders/WiiUDownloader
Translate this page with Google Translate
Installation
Please note: USBHelper should really only be used as a download manager and unpacking program. If you are using Cemu, you probably should have a seperate Cemu instance that you get from the Cemu website. See Emulation for more information
- Windows
- - Automatic Installation via an Installer
- - - Gathering Files
You will need
USBHelperInstaller.exefrom FailedShacks Github repo (Latest Release)
- - - Installation Steps
- Get the
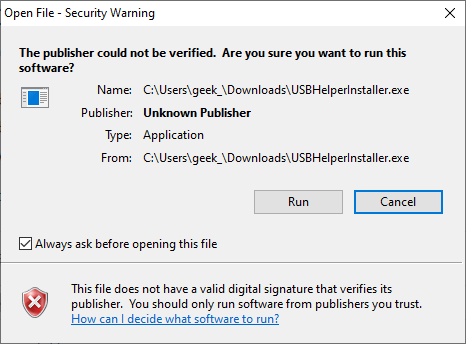
USBHelperInstaller.exeand save it somewhere like your Downloads Folder or Desktop. Don't worry about when the installer was released as it downloads the latest release of the launcher and the version of USBHelper you select in step 3. - Run it, if you get a warning, it's safe to dismiss, just click on Run

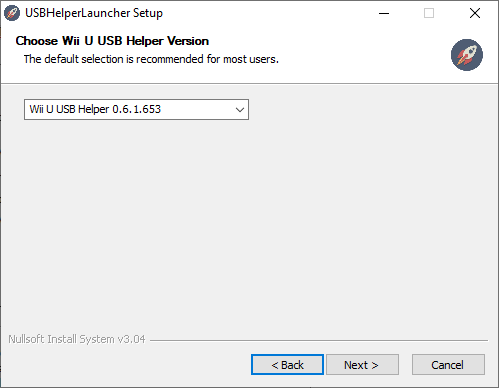
- Click on Next and then Agree and you will see this window. The selected version will be fine. Newer or Older version have minor differences that might cause some issues.

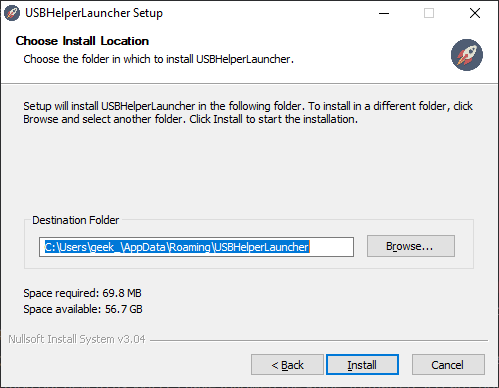
- The next page will ask you where you want to install USBHelper, AppData will work but I do recommend changing it to a folder that you have permissions to read and write to. Something like your "Games" drive if you have one. Then click on Install

- Let it do its thing as it downloads USBHelper and the Launcher from the Internet

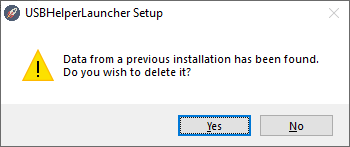
- If you get this message, read it and make your own choice.

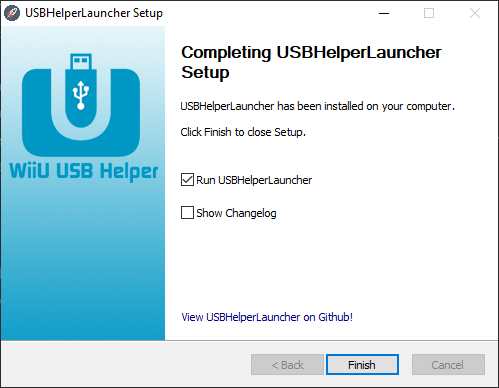
- You are now Finished. (Un)-Tick the options you do (or don't) want and then click on Finish

- Now you can go down to First Run (After Installation or "Clearing")

- - Manual Installation ... so by hand (no installer)
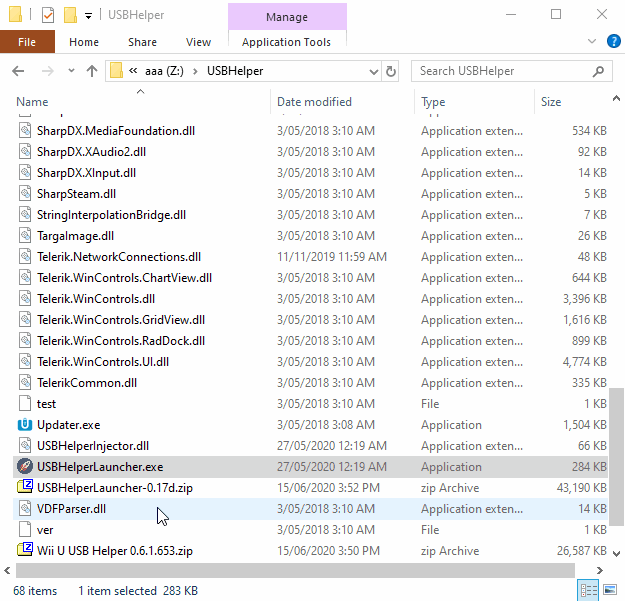
- - - Gathering Files
You will need
- USBHelperLauncher from FailedShacks Github repo (Latest Release)
- An archived version of USBHelper
- Version 0.6.1.653 is recommended as USBHelperLauncher was built around it so has the "best" compatibility
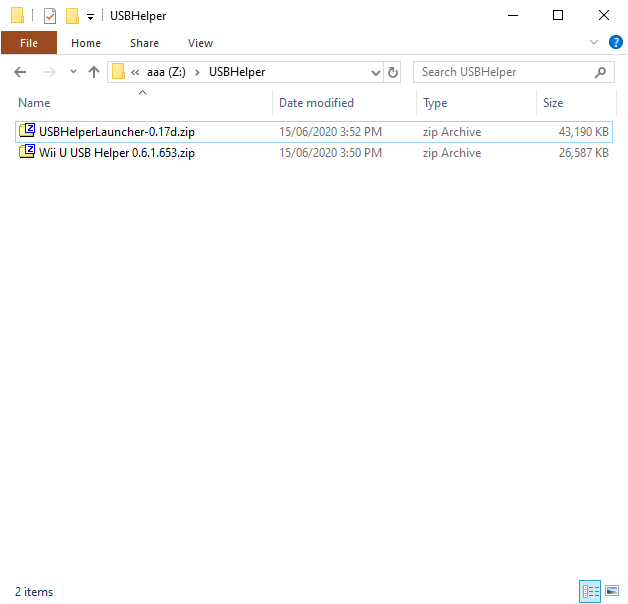
- Put both zip files in the same folder (let's call it USBHelper)

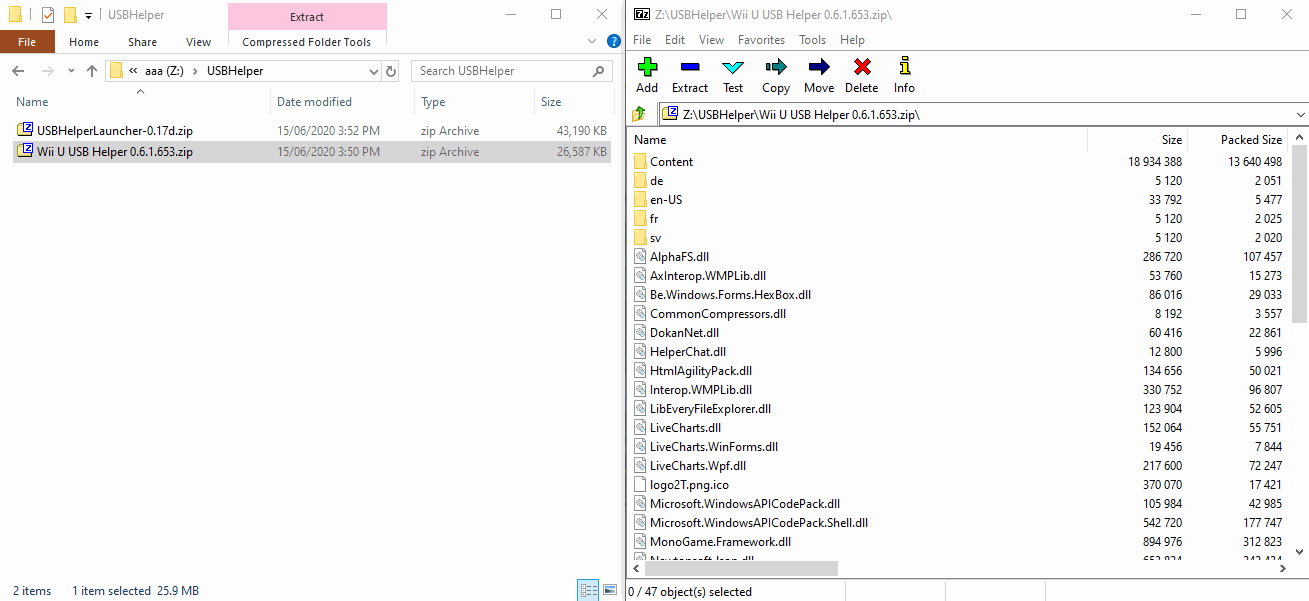
- From that, Open the USB Helper zip file (in this example it is
Wii U USB Helper 0.6.1.653.zip), select everything and drag and drop those files into the USBHelper folder
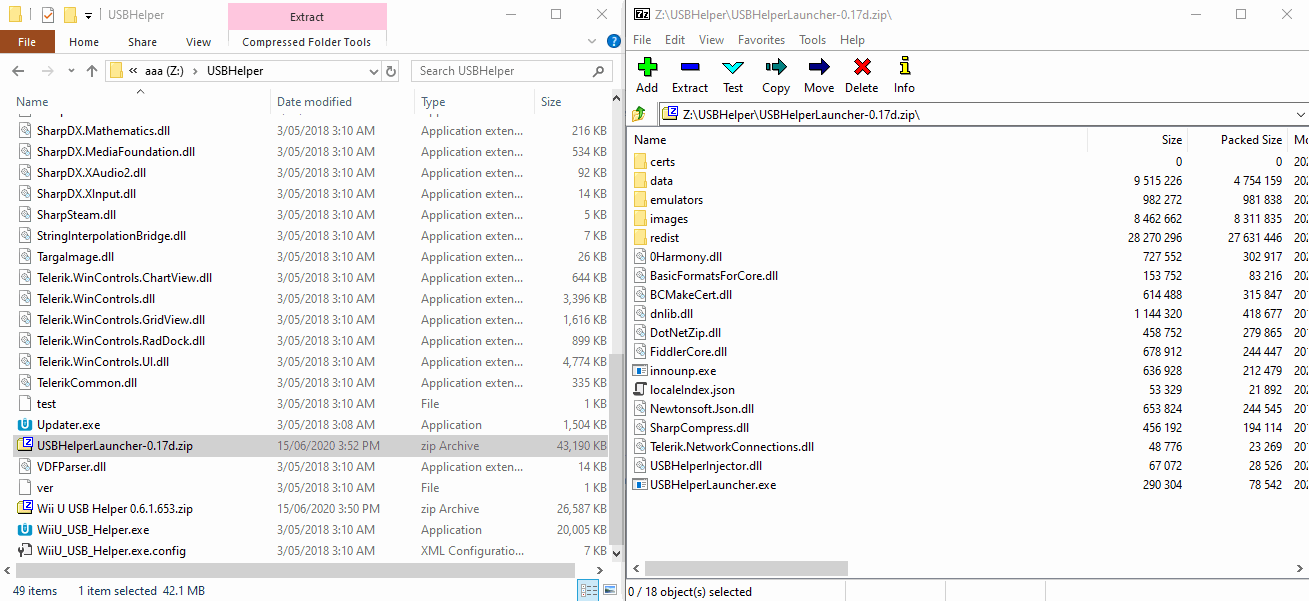
- Close that zip file and open the USBHelper Launcher Zip file (in this example it is
USBHelperLauncher-0.17d.zip) and do the same as step 2. Select everything, Drag and Drop and now you need to Overwrite existing files.
- (optional) Finally, Right click on
USBHelperLauncher.exeand right click on it, sending it to your Desktop as a shortcut.
- Now you can go down to First Run (After Installation or "Clearing")
- Linux
Linux mode is via Wine or a Docker container. It is highly experimental and is prone to issues. It would be better to run a Windows instance to use this program either via virtualisation or dual boot.
- - Docker
The docker image for USB Helper (arcticdiv/usbhelper, source code) already comes preinstalled with wine-staging, dotnet48 and Wii U USB Helper + USBHelperLauncher, and provides access to a virtual desktop using a VNC client or a browser.
To get started, you can use the docker-compose.yml file and just run docker-compose up (provided you have docker-compose installed), or use the docker image directly with:
docker run -it \
--name "usbhelper" \
-v "$(pwd)/data/userdata:/home/user/usbhelper/userdata" \
-v "$(pwd)/data/downloads:/home/user/usbhelper/downloads" \
-p "127.0.0.1:5901:5901" \
-p "127.0.0.1:8081:8081" \
arcticdiv/usbhelper:latestThe VNC server only binds on localhost/127.0.0.1 by default, therefore a password isn't strictly necessary. If you still want to set a password for the VNC connection, set the VNCPASSWD environment variable for the container accordingly.
Once started, either navigate to localhost:8081 with a browser of your choice, or connect to localhost:5901 using a VNC client. Downloaded files will be located in data/downloads.
Now you can go down to First Run (After Installation or "Clearing")
- - Wine
- Install wine-staging for your distribution (e.g.
apt install winehq-stagingon Ubuntu/Debian and derivatives, after adding the repo) - Install winetricks
- Set up a 32-bit wineprefix:
export WINEARCH=win32 WINEPREFIX=~/.wine-usbhelper && wineboot -u(you can change theWINEPREFIXpath to whatever you want)
- Install .NET Framework 4.8:
winetricks --force -q dotnet48(--forceis required as of Wine 5.18, installation may hang and have to be retried a few times,-qforces the installer to run headless and ups the succes rate of winetricks on 5.18+)
- Follow the manual installation steps, but use this build of USBHelperLauncher instead of the one linked on the manual installation page.
- Run
cd <extraction dir> && wine USBHelperLauncher.exe(remember to setWINEPREFIXagain if you restart your shell) - Now you can go down to First Run (After Installation or "Clearing")
First Run (After Installation or "Clearing")
- Run your Desktop Shortcut if you have one, or launch
USBHelperLauncher.exedirectly from your USBHelper folder. Wait for it to Update Translations and do some inital Injecting. You should then see this window
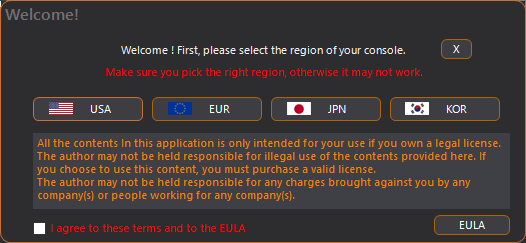
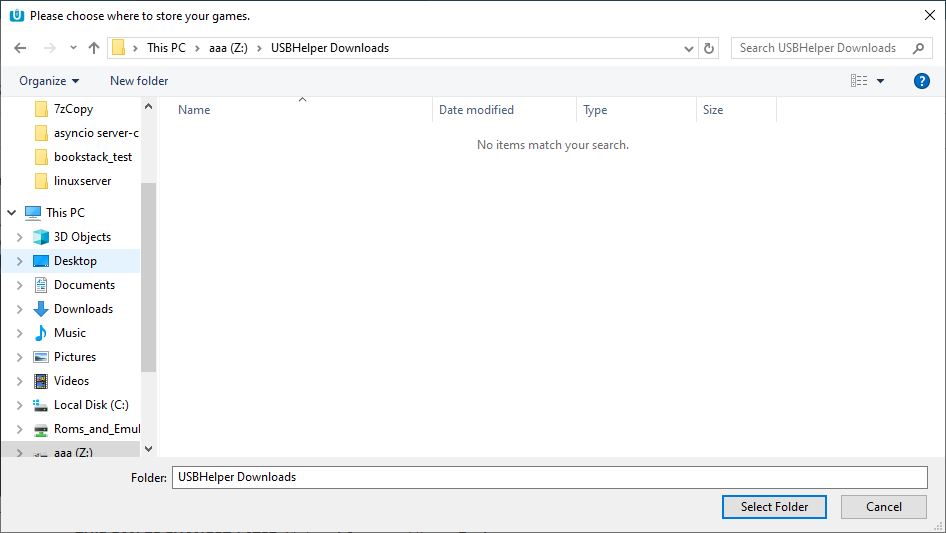
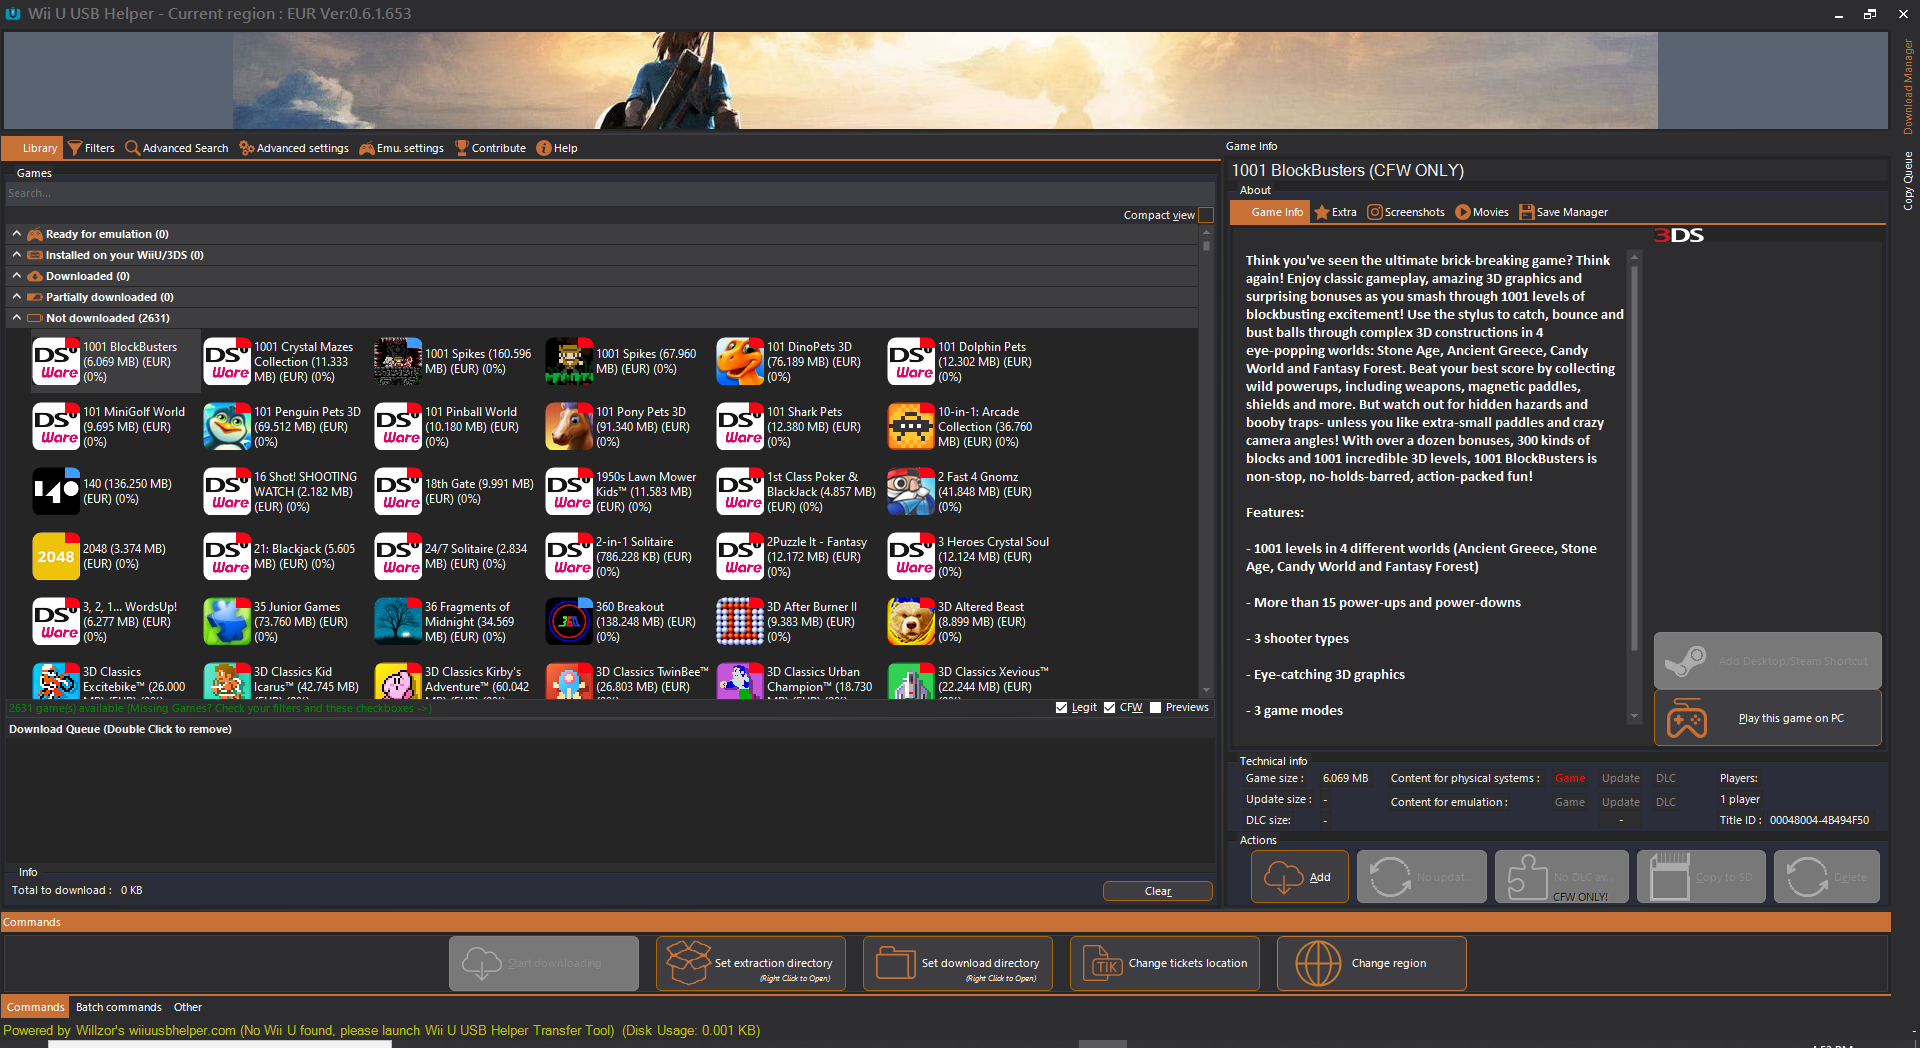
This is where people get confused, this is not selecting what server USBHelper downloads from BUT what region the games are in. THIS CAN BE CHANGED LATER (see "Recommended Tweaks and Settings > Setting Extra Regions"). Click on I Agree and then a Region. - This next step is important. You want this on your largest drive and one you have read/write permissions. I suggest making a WiiU Games folder near the root of your drive (Look at the image below) and linking it to that. This is where USBHelper downloads the encrypted games and stores any other necessary files.


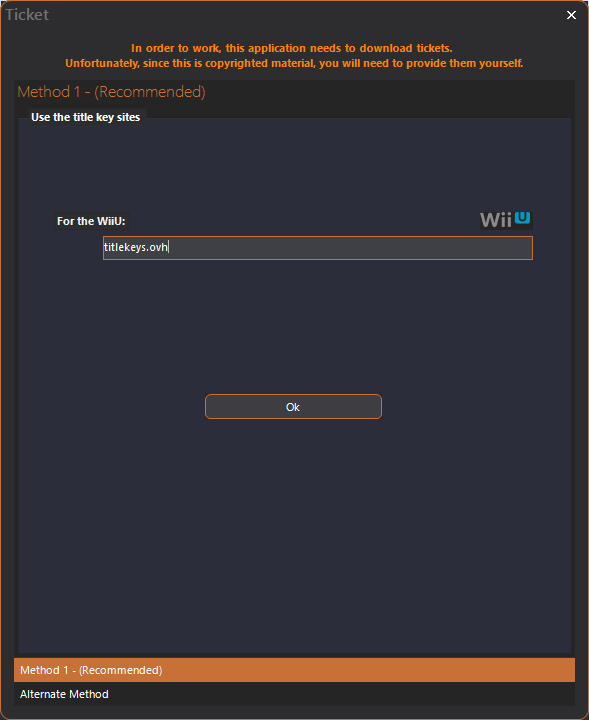
- Now it will ask you for a titlekey site or something... Lots of people seem to get this wrong as well. Enter one of the following and click on Ok
*titlekeys.ovh
*vault.titlekeys.ovh

If you get an error message after you click on Ok, Close USBHelper, reboot your PC and try again. If the same error is keeps coming up, join the Discord
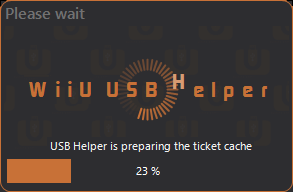
- Now it will prepare the ticket cache, this does take a while depending on your PC and Internet connection. Just wait for it to complete

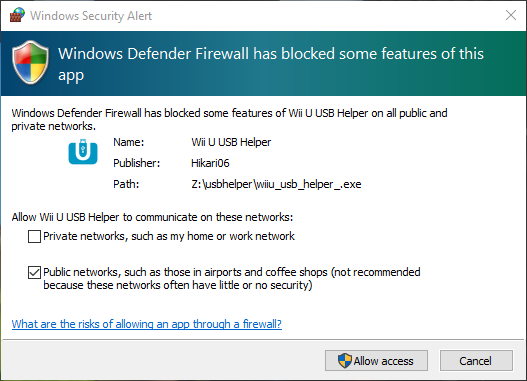
- It may ask you to allow the program through your Firewall. Click on Allow access

- And there you go, USBHelper is installed and running


Recommended Tweaks and Settings
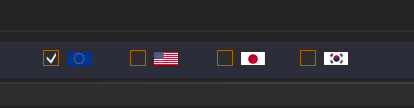
- Setting Extra Regions
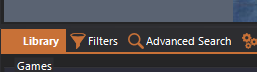
- Open USBHelper and go to the Filters tab

- At the bottom of that page you will see 4 flags representing in order (left to right)
* EUR (Europe)
* USA (America)
* JPN (Japan)
* KOR (Korea)
Feel free to tick the ones that represent the games you want to find.
- Setting The Filters
- Make your way to the Filters tab
- Make your filters look like this

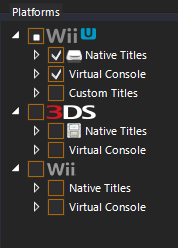
This will filter out any
- Wii "games" (Because it is a WiiU downloader)
- 3DS (as you can no longer download 3DS games using this method as Nintendo patched their servers)
- WiiU "Injections" as there are better tools out there for these, like UWUVCI (Ultimate WiiU Virtual Console Injector)
Developer's Note: There are no actual Wii titles on Wii U USB Helper. Other than injections.
Downloading a Game
- Searching for the game
(Optional) Search for your game using the search bar.
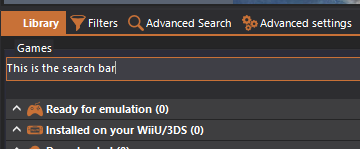
Note: The search isn't too accurate so the less keywords you use the better, so "The Legend of Zelda: Breath of the Wild" would be "Zelda Breath Wild"
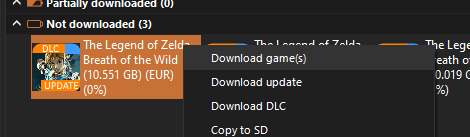
- Adding it to the Queue
- Right-click the game and click on "Download Games"

- (Optional) It may ask you if you want to download the Update (otherwise known as the Patch) and/or the DLC. You can select Yes or No. This is your own choice
Note: The Legend of Zelda: Breath of the Wild REQUIRES at MINIMUM its "Day One" patch (which is v32 or v33 depending on region)
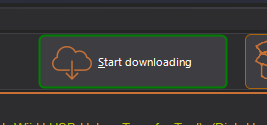
- Starting the Download
Press the Start downloading button
Finalising the process
- NUS Content (WUP) Output
You will need CFW (Custom Firmware) or "Sigpatches" to use
- Pirated DLC
- WiiU Virtual Console titles (Including injections)
- WiiU Homebrew Forwarders
Most of you will be using Tiramisu, Mocha or Haxchi as your CFW so you won't need to use a sigpatch. See https://wiiu.hacks.guide for more information.
- - WiiU (Recommended)
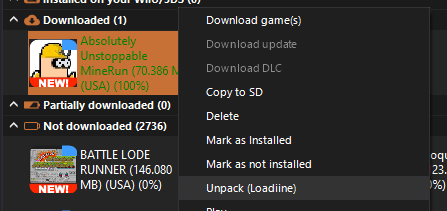
If you want to Install the game on your WiiU, you can right click the game in your "Downloaded" list and click on "Copy to SD". This is probably what you want if your goal is to install it using WUP Installer.
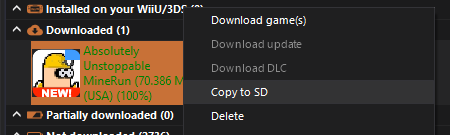
You will need an SD card in your PC for this to work correctly
- - WiiU (Transfer Tool)
This uses FTP to copy the WUP to your SD card in your WiiU, this is a SLOW process (and I mean SLOW). It will be much faster to do it the recommended way
USBHelper Transfer Tool - Mega Link
- - PC
Right click the "Set Download Directory" folder, it will open your USBHelpers download folder.
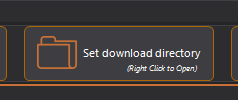
From there, look through the folders to find what you want
- Raw Files Output
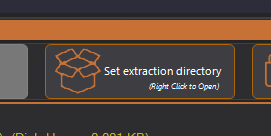
- - Setting an Extraction/Unpack folder
- Make a new folder, preferably in the folder you chose for your USBHelper downloads to be done (step 2 in First Run (After Installation or "Clearing")) and lets call it Unpacked Files.
- In USBHelper, LEFT CLICK on the Set extraction directory button at the bottom of the window

- Navigate to that folder you made in Step 1 and click on Select Folder
- - Unpacking the data
- If you want to Unpack the game, you can right click the game in your "Downloaded" list and click on "Unpack (Loadiine)" (it could be "Unpack (Cemu)" now).
This is probably what you want if your goal is to play it on Cemu emulator.

- You can then "install" it into Cemu (https://cemu.cfw.guide/installing-games) or do whatever else you want
Frequently Asked Questions
- USBHelper was discontinued right? How is it still working?
USBHelper was technically discontinued but USBHelperLauncher bypasses/disables the "killcode" and patches various other aspects of the program to allow it to work.
- Does USBHelper have a virus/miner?
Technically, it did contain a miner which could be ran (voluntarily) to get access to "donator" features (e.g. different themes). USBHelperLauncher disables it (and automatically enables "donator" features without having to mine/donate), in addition to the fact that the servers from which the miner was downloaded from have been offline for a while.
- Can I download 3DS games with it?
The answer is no. Nintendo patched the 3DS servers, which means 3DS titles can no longer be downloaded, no exceptions.
You can read more about it here: https://torrentfreak.com/nintendo-plugs-leak-that-provided-free-3ds-game-downloads-180823/
- I think I messed up my installation, can I reset it?
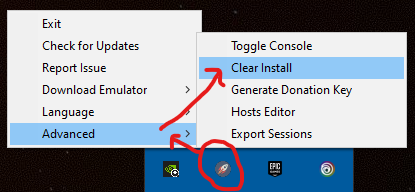
Yes, You can "Clear" you installation which resets your settings and configuration to the default state (like when you installed USBHelper for the first time) by doing the following
- Find the USBHelperLauncher Icon in the taskbar
- Right click it and go Advanced > Clear Install

- From that you will need to go back up to First Run (After Installation or "Clearing")
Issues and possible fixes
- Issue: Old Driver error
If you have an error like this:

Stop using the "Play on PC" button and set up Cemu seperately. You will need to
- Follow the official Cemu Guide to set up Cemu > https://cemu.cfw.guide/#get-started
- Unpack your games
- Install your games to Cemu > https://cemu.cfw.guide/installing-games
- Issue: Text boxes are hidden, too big or things can't be found (like this)
Solution: You need to change your Screen scaling to 100%
Reason: USBHelper is not DPI aware
- Issue: USB Helper Launcher closes after Injecting... and nothing happens. There's no icon in the taskbar either. What do I do?
- Press Win+R
- Type
%AppData%and press Enter - Enter the folder named
Microsoft - Remove the folder named
Crypto
- Issue: How do I get past USB Helper is preparing the ticket cache?
- Press Win+R
- Type
%AppData%and press Enter - Delete the folder named
USB_HELPER - Press Win+R
- Type
%LocalAppData%and press Enter - Delete the folder named
Hikari06
- Issue: I am unsure what is going on. Can I make a log to post/view?
Yes you can, there are 2 methods of making a log.
- - Using the Task Bar Icon - Good if USBHelper is running
- Find the USBHelperLauncher Icon in the taskbar
- Right click on it and click on "Report Issue"

- It will automatically copy a link to your clipboard which you can use to report to the USBHelperLauncher Discord
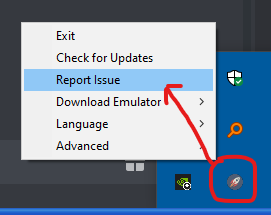
You can hold Shift and click on Report Issue to create a file version of the log
- - Using the --showconsole command line argument
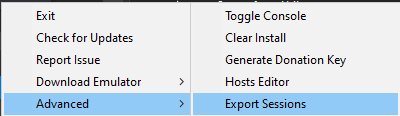
USBHelperLauncher.exe --showconsole > console_log.txt- Issue: Something isn't working. How can I export USB Helper's network traffic for debugging?
- Find the USBHelperLauncher Icon in the taskbar
- Right click on it, select "Advanced" and click "Export Sessions"

Configuration (conf.json)
{
"Launcher": {
"HostsExpert": [internal] [bool] Don't show warnings about conflicting hosts in 'hosts.json',
"ShowUpdateNag": [internal] [bool] Notify about updates to the launcher,
"ShowTranslateNag": [internal] [bool] Ask to contribute translations to crowdin,
"ShowHostsWarning": [internal] [bool] Warn if 'hosts.json' file doesn't exist,
"ShowCloudWarning": [internal] [bool] Warn when cloudsave feature is used,
"SessionBufferSize": [number] Number of requests to buffer for the session export feature,
"SessionSizeLimit": [number] Maximum size of a single request in the buffer,
"Locale": [internal] [string] Country code of selected language,
"TranslationsBuild": [internal] [string] Last 'translations.zip' etag/version,
"LastMessage": [internal] [string] ETag of last MOTD,
"EndpointFallbacks": [internal] {
"<endpoint name>": [string] Redirection target URL
},
"TitleKeys": {
"wiiu": [string] WiiU titlekey url
},
"DoNotModify": [internal] [string] Used for detecting program version upgrades,
"IPCType": [string] Type of connection used for communicating between launcher and injector (valid values: "TCP", "NamedPipe")
},
"Injector": {
"DisableOptionalPatches": [bool] Disable optional patches (i.e. the patches that are not *required* for the program to work),
"DisableTabs": [internal] [array of strings] Names of the tabs to be hidden in the UI,
"MaxRetries": [number] Maximum number of download retries per file,
"DelayBetweenRetries": [number] Milliseconds to delay after failed download before retrying,
"Portable": [bool] Store application data in the launcher's directory instead of %appdata%/%localappdata%,
"ForceHttp": [bool] Force HTTP instead of HTTPS for connections between USB Helper and the launcher,
"NoFunAllowed": [bool] Disable 'fun' patches,
- [The following options are only available in the current 0.18 beta] -
"BackgroundMusic": [bool] Enable background music (can also be toggled inside application),
"SplitUnpackDirectories": [bool] Split output directories into "Base Games" and "Updates and DLC" when unpacking,
"DefaultFont": [string] Path to font used for ffplay
}
}Maschells Toolkit
This page contains information about the 3 tools I (the author) suggest for WiiU things
Prerequsites
- Java: https://adoptopenjdk.net/
- Just get the default selection
JNUSTool
Functions
- Downloads WUPs
- Downloads RAW
- Can download "individual RAW files"
Cons
- Can be a little too fast for its own good - can crash and/or miss files
- Fix: run the command multiple times, it will skip verified files
- Has a GUI but can only be used for update
- Fix: Use it via command line
Pros
- Cross Platform (Java)
Usage
- Open the
configfile in your favourite text editor and replace[COMMONKEY]with the WiiU Common Key.
java -jar JNUSTool.jar titleID titleKey argstitleID- Title ID of the title - no dash
titleKey- Title Key of the title - only needed if using
-file
- Title Key of the title - only needed if using
- Other Arguments (use one or the other)
-file <regex>: download a file / set of files.- Example:
-file .*should download all files - Note: remember to escape the * with your terminals escape character
- Example:
-dlEncrypted: download the WUP- Note: does not generate a
title.tikso it is not capable to be installed with Wupinstaller use a different NUSDownloader to do that
- Note: does not generate a
vX: internal version of the download (optional, will download latest version if omitted)- for example
v64
- for example
JWUDTool
Functions
- WUD <> WUX conversion
- WUP extraction
- RAW file extraction
Cons
- No GUI - Command line only
Pros
- Does everything you might want to do with Disc Images (except create them)
- Cross Platform (Java)
JNUSLibDecryptor
Functions
- WUP > RAW
Cons
- No GUI - Command line only
Pros
- Cross Platform (Java)
FunkiiU/FunkiiUi
What is it?
FunkiiU (and FunkiiUi) is a NUSDownloader written in Python.
- Pros
- Python
- Cross Compatibility
- Generates Tickets
- Python
- Cons
- Can be fussy if you use the wrong version
- Only outputs a WUP
Requirements
- Python 3.7 +
- FunkiiU or FunkiiUis
- FunkiiU | Link
- FunkiiUi | ?
How To
After you have installed Python
Running WiiU Software
Emulation
You have 2 options
- Cemu
- Pros:
- Currently the best WiiU emulator out there
- Has the best compatibility
- Regular updates
- Cons:
- Closed source
- Pros:
- Decaf-Emu
- Pros
- Open Source
- Cons
- Still a work in progress
- Pros
Now, if you want to use Cemu (which is recommended so far) you will want the following hardware.
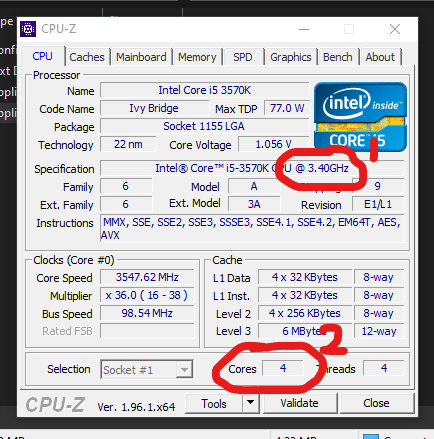
- CPU: 4 physical cores or more at 3.2GHz or better
- If you don't know follow these steps
- Get CPU-Z from https://www.cpuid.com/softwares/cpu-z.html
- 1 is CPU speed
2 is Physical Cores
- If you don't know follow these steps
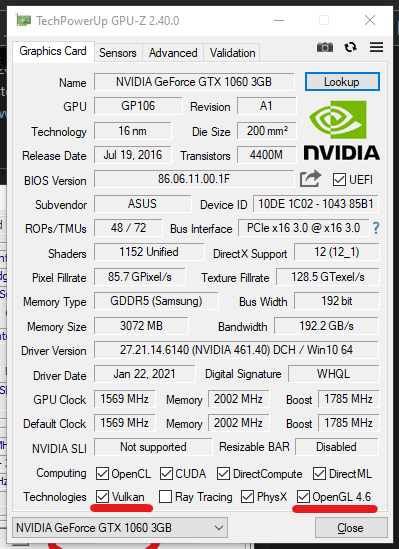
- GPU: GTX 760 or better (Or AMD equivalent)
- OpenGL 4.5 and/or Vulkan 1.1
- If you don't know follow these steps
- Get GPU-Z from https://www.techpowerup.com/download/techpowerup-gpu-z/
- OpenGL and Vulkan compatibility is shown at the bottom

- Vulkans Version (If it is compatible) can be found here

- If you don't know follow these steps
- OpenGL 4.5 and/or Vulkan 1.1
- 16GB of ram (This can be found in task manager or in CPU-Z)

If your PC passes the above checks, then you can get Cemu from https://cemu.info/ and follow the setup instructions at https://cemu.cfw.guide/installing-cemu
Real Hardware
The soft-mod (CFW)
You will need to soft-mod your WiiU with a CFW of your choice. Please follow the guide at https://wiiu.hacks.guide for more information.
Getting the game to your WiiU
Just putting it on your SD card
Your files/WUP will need to be under SD:/install/GameName/*.* so, for example Breath of the Wild will be under something like the following:
SD:/install/Zelda BotW/*.app
/*.h3
/title.tmd
/title.tik
/title.cert
SD:/ is the letter assigned to your SD card, so if your SD card is G then it would be G:/
If you need to manually create the install folder, make sure it is all lower case
The game name must contain no unicode/special characters. All ASCII characters and brackets are ok (so like []())
Using USBHelper
USBHelper has a handy "Copy to SD" button built into it, so you don't need to follow the above steps.
*Via FTP
*Via the WiiU Transfer Tool
Installing the game
Just use WUPInstaller GX2 while CFW (Mocha or Haxchi) is active.
Translated Pages
This chapter will contain all the pages that have been community translated. Editors/Contributors, Please link to the original page at the top of your translation and add a link to the top of the English one.
Links to Hardware Mods and other shit
Teensy WiiU Unbrick Guide > https://gbatemp.net/threads/guide-kaflukes-hardmod-cbhc-unbrick-guide.476725/
Raspberry Pi WiiU Unbrick Guide > https://lazr1026.github.io/unbrick/
SLC NAND (K9K8G08U1D) Datasheet > K9F4G-08U0D.pdf
Bit-banging a TSOP-48 NAND Flash with the RPi > https://forums.raspberrypi.com/viewtopic.php?t=16775
WiiUBrew info page > https://wiiubrew.org/wiki/Hardware/TSOP_NAND
Pin-out for Raspberry Pi's > 